Pasta with artichokes

Simo_RicettaMy friend had made this pasta and posted on #instagram. It looks so easy and yummy that I asked her if I could use it for my blog. This is how she made it.

What you need: one small shallot; one or two big fresh artichokes or 4 already prefaced and ready to use. 4 slices of prosciutto crudo or ham. Parmigiano cheese.

If  you don’t know how to clean artichokes watch this video. Otherwise, clean your artichokes and slice them very thin. In a skillet with extra virgin olive brown the shallot and when transparent add the artichokes. Cook until soft and gold, but not dry. Add the ham chopped in small dices and let cook for other few minutes.

Cook the pasta according to the directions, drain and place in the skillet with the sauce. Add parmigiano reggiano cheese, salt and pepper and serve.


Guest Post: Inviting Asha for dinner Indian and vegetarian cooking

Image

White-pumpkin/Bottle Gourd/Zucchini Koftas in Gravy

So All my friends are really into food. What is even better is that they are all from different countries, which makes it a lot of more interesting when we talk about food. I have asked few of my friends to share some of their recipes with me on my blog and theirs. Here it follows Asha’s description. Check her blog out.

Ginevra is a close friend of mine from my PhD days at Florida State. We shared amongst many other things, the love of food. Here is a recipe for her. Do visit her blog at http://www.gincoolette.com

The idea of using a vegetable of the squash/pumpkin family in a dish as elaborate as the Kofta was not appealing. At all. Until I was fed this at my mother-in-law’s. Generally, a kofta dish consists of a rich gravy, either tomato or cashew/almond based, with balls of cottage cheese/potatoes/nuts submerged in it. My encounters with this dish, often ended up with me asking for warm water spiked with lime to wash this greasy dish down, and vowing never to attempt tasting this dish until the next appearance of Hailey’s comet. However, the recipe I will share today is rather simple, yet delicious, completely palatable, and highly addictive. While the koftas (we are going to call them fritters, as I am uncomfortable referring to them as balls) are fried, the gravy is devoid of any fattening agent like cashew-nut paste or heavy cream, thus making it reasonably healthy. In fact, if you bake the fritters you can cut down on the oil, but if you make it for the first time, I suggest you fry them for maximum taste. Of course, second time onwards tailor the recipe.

Ingredients for the Koftas (Fritters)

1 medium sized bottle gourd/lauki (If you aren’t able to procure this, try zucchini for very similar results, in fact it tastes outstanding with zucchini as well)
3-4 heaped tablespoons of gram flour (you can get this at any ethnic store, also called besan)
6-7 cilantro/coriander seeds

Salt and Cayenne Pepper to taste

Ingredients for the gravy

3-4 juicy tomatoes
1 onion
1 inch piece of ginger
3-4 cilantro/coriander seeds
2 tablespoons of coriander powder
½ teaspoon of ground turmeric
Salt to taste

Making Kofta/fritters

Wash the gourd/zucchini thoroughly and grate them using a grater. If you use zucchini, use about 3 of the large sized ones. Squeeze out all the extra water, and keep it aside.

Put a teflon-coated pan on low heat, and slowly roast the gram flour for about 2-3 minutes. You will have to watch this constantly to ensure this doesn’t burn. The purpose of doing so is to get the raw taste out of the gram flour. I guarantee you will be able to procure gram flour anywhere; however, if you are unable to do so, skip the steps above and use cornflour instead. Once roasted lightly, keep it aside until cool.

In a different pan, dry roast the coriander seeds for a minute or so, and lightly pound them using the pestle and mortar. You do not need to pulverize the seeds, just a slight whack on them is sufficient. You may roll a rolling pin on them once or twice too if you don’t have the pestle and mortar.

In a bowl, put the grated gourd/zucchini, gram flour, salt, pepper, and coriander seeds, and mix them. The gram flour is a binding agent, so if you feel the need to add more, feel free to do so. You should be able to make roundels without any breakage.

At this stage you have two choices, fry them or bake them in muffin tins. For an authentic experience fry them. You may choose to bake them, when you make them the second time. Fry them until crisp, and at this stage they make perfect snacks, and I am infamous for gobbling one or two, while my chai (tea) is brewing in the teapot. Keep them aside on a plate lined with absorbent tissue to soak up any extra oil.

Making the gravy:

I won’t be using my pestle and mortar here, as I need a smooth paste for my gravy. This is quite a refined and spectacular dish, so let’s get the food processor going. You will need to add the tomatoes, ginger, and the onion in the food processor and give it a blitz until you get a smooth paste.

In a deep dish, add some oil, about 2-3 tablespoons, and let it heat. Add the coriander seeds, and carefully add the tomato-ginger-onion paste to the pan. Be cognizant of the fact that the mixture may splutter, so keep your distance. Keep stirring this mixture; add salt, coriander powder, and turmeric to this mixture, along with 2-3 cups of water. You want to cook this mixture until the raw taste of the paste goes away. This should take about 15-20 minutes tops.

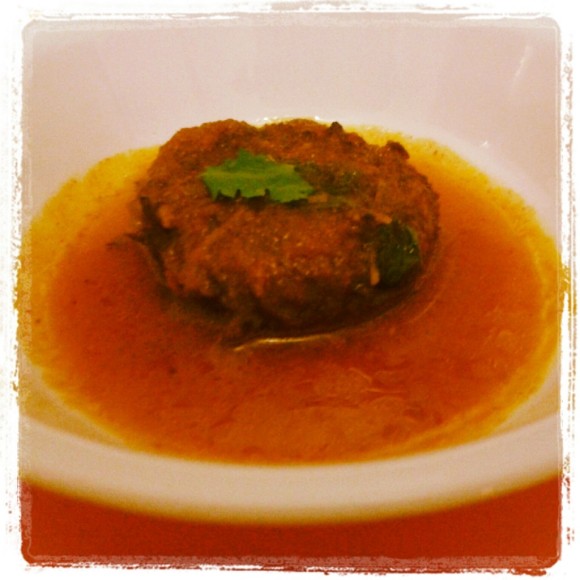
To serve, put a fritter in a serving dish and ladle  the cooked gravy onto it. Alternatively you could let the fritters cook with the gravy in the last few minutes.

Garnish with a sprig of coriander/cilantro.

Traditionally, this dish is very rich and heavy, and this is a nice way to enjoy this dish. The use of gram flour significantly cuts down on calories, and the ill-effects of cornstarch; and if you choose to bake the goods, you have got yourself one healthy dish. With every bite of the fritter, you can taste the unique flavor of the cilantro/coriander seed. Scoop up this dish with warm bread or even alone.

Please visit her food blog at http://artmasala.blog.com/2012/11/26/white-pumpkinbottle-gourdzucchini-koftas-in-gravy/

Best and easy pizza dough recipe

How many times have you tried to make home made pizza dough and it’s just does not taste like the one you buy at the store or in a pizzeria? I have become obsessed with pizza lately. I had posted previously how to make pizza dough using regular flour or wheat flour (all purpose) and following the typical Italian way of cooking. It was still good, but it was not the soft yet crunchy pizza I eat in Italy. The other day I was watching Test Kitchen and they were making pizza dough. I was skeptical because they did some weird things, but I gave it a try and it turned to be amazing. There are still few things I will change. I will talk about what I loved and hated about this recipe and whether it was easy to make at home.

This is the recipe: I strongly suggest to register for free on their websites because you get access to more details, but you can still watch the videos of the pizza dough. All credits go to America’s Test Kitchen. I will tell you whether I changed something.

Pizza Dough Taken from America’s Test Kitchen 

  • 3cups (16 1/2 ounces) bread flour, plus more for work surface (see note)
  • 2teaspoons sugar
  • 1/2teaspoon instant or rapid-rise yeast
  • 1 1/3cups ice water (about 10 1/2 ounces) (see note)
  • 1tablespoon vegetable oil, plus more for work surface
  • 1 1/2teaspoons table salt
    • 1. FOR THE DOUGH: In food processor fitted with metal blade, process flour, sugar, and yeast until combined, about 2 seconds. (I used the KitchenAid). With machine running, slowly add water through feed tube (I slowly added water); process until dough is just combined and no dry flour remains, about 10 seconds. Let dough stand 10 minutes. (This was weird because my dough did not unified and it was all broken in pieces. I added some more water to fix the problem).

    • 2. Add oil and salt to dough and process until dough forms satiny, sticky ball that clears sides of workbowl, 30 to 60 seconds. Remove dough from bowl and knead briefly on lightly oiled countertop until smooth, about 1 minute. Shape dough into tight ball and place in large, lightly oiled bowl. Cover tightly with plastic wrap and refrigerate for at least 24 hours and up to 3 days. (I used the dough the third day. It looked sticky so I added some flour to work it. I divided the dough into two balls so two pizza. The recipe said to use a pizza stone and heat it up at high temperature. I think 500. Then to cook it at the very top of the oven. I did not have the stone so I used a metal round tray with holes at the bottom. I also could not place the tray at the very top. It was in the middle. My oven just is not that great I guess. The stove was at 500 when I cooked the pizza. Here something else I did differently. I always cook the dough before I top it with everything else. That is because otherwise it does not cook and the pizza gets soggy. I cooked it for 5 minutes but I would push it to 7 or 8. Then I added a full spoon of tomato sauce from a jar -did not have time to make it fresh- and added shredded mozzarella. I cooked it until the cheese melted and the crust was gold/brown. Also my dough when I work it is always thin. I like thin crust. 

      Verdict: the pizza is amazing. It really reminded me of something you buy at a pizzeria. The only critique is that I would not add sugar. The dough was too sweet for me. Very tailored to American taste. Also I thought it was weird to use yeast and ice water because of the process of yeast, but it worked. Another secret was the flour. I always used regular flour but the bread flour is magic because it allows rising of the dough and adds elasticity. I never imagined Americans would teach me how to make Italian thin pizza:) 

      Image

Easy Classic Hamburger

I usually don’t make hamburgers because they always turn dry inside. I also don’t eat much red meat. Though this week we are basing our recipes on proteins, which includes meat and eggs (and green veggies).

American Classic Hamburger

one pound of ground beef (grass fed); 1/4 teaspoon of salt, 1/4 teaspoon of pepper; one tablespoon of Worcestershire sauce; 1/2 teaspoon of soy sauce; 1 teaspoon chili powder; 1 teaspoon fresh Asian hot chili sauce (optional); one clove of fresh garlic minced; 1 teaspoon of dry green herbs (could be anything from basil, to thyme). 2/4 cups of bread crumbs.

American Cheddar Cheese for garnish. 4 slices of crispy bacon. Papaya, Ketchup or Mustard (optional). Obviously, you can add/omit any of the ‘garnish things.’

Mix in a bowl the meat and all the ingredients  very well and let rest in the fridge for at least 4 hours. You probably want to prepare this in the morning or at night so you will have an easy dinner the next day.

When you are ready to use the meat, prepare from 4 to 6 patties, shape them like hamburgers. (I like mine to be small, but thick). Heat up a grill and when it is hot enough cook the patties and the bacon on both side. It will take the hamburgers around 15 minutes to cook (depending on how you like your red meat cook). These were medium. The last 2 minutes, place the cheddar cheese on the burgers and let melt. At that point your hamburgers are ready.

Absorb the extra oil from the bacon. On a plate place the hamburger. Then on top of the cheese put one long strip of bacon. On top of that if you like put diced/minced papaya.

Add other condiments if you like. I do not like bread with my hamburger. I found it to be useful extra empty carbs I don’t really need or enjoy.

I served the hamburger with a spinach salad and papaya slices.

Mushroom Strudel

What an easy recipe. It s a mushroom strudel which only takes few minutes to prepare.
strudel mushroom

One pack of pastry dough found in the freezer section of Publix unless you want to make it home-made but then it would not be fast and easy;)
One box of mushrooms (champignon)
Fresh thymes
One teaspoon butter
One teaspoon white wine
Feta cheese (one cup)
One slice of ham
One egg

I suggest to stop by at the supermarket after work and buy the pastry dough because it needs 45 minutes to defrost- so by the time you get home it will be ready. Wash the mushroom and in a skillet place the butter to melt. Add the mushrooms, fresh thymes, salt pepper and white wine. Cook under tender. Set aside. Work the dough like it was a pizza dough until it is thin and shape in a long rectangle. With a brush pour a little bit of melted butter on it. Add a layer of mushrooms, ham, and cheese. Roll it and close the edges. Whisk the yolk and brush the strudel very well.
Place in the oven for 50 minutes- The oven should be at 350!!

So the preparation requires only 10 minutes. You can place it in the oven and work out or take a shower.

By the way the other thing on the dish is chicken but I ll get the recipe another time.

20121029-205329.jpg

Pappardelle with chestnuts and pecan sauce

I love egg noodles. I found those at the Fresh Market. I don’t think they are organic. For this type of pasta I like to prepare more unique sauces. This one is very easy to make.
one cup of walnuts slightly chopped (10 in nutshell) half cup of pecan chopped, one clove garlic, one small carton of heavy cream, one cup of shredded Parmigiano reggiano, salt, pepper, nutmeg, some butter

You can chopped the nuts with the handmixer with the garlic clove. Add in a bowl the heavy cream, a spoon of butter (optional), salt, pepper etc. When the pasta is cooked add the sauce to the bowl with the pasta. Add cheese and serve hot.

If you want more texture and strong flavor you can add Gorgonzola cheese and red caramelized onions. This version is much heavier. This is definitely not a light dinner, but at times we do enjoy our cream:)

Sorry I don’t have the picture, but I am posting a photo of my hometown in Lucca-

20121016-202854.jpg

Pesto with parsley

I have already posted an entry about pesto, but the other day as I was discovering that my basil does not want to grow, I was left with the desire to make pesto. So I used a bunch of parsley and one stem with leaves of basil, 1/4 cup of fresh white onions, olive oil, salt, pepper and a spoon of water. I added one cup or less of shredded mozzarella too. I put everything in the food processor and it was one of the most delicious pesto version I have ever had. It was very refreshing and had a sweet taste. It was also not dry. I think mint would have added a nice touch too.

Image

Wheat Pizza

I am on this save every penny kind of deal, because I am going to Italy for a conference and by August I will be officially unemployed.  I don’t even buy pizza dough already made from Publix. So I created this wheat pizza with ingredients I had in the fridge and pantry. I love thin, flat pizza. I hate fast food pizza, unless it is Sbarro. One thing I don’t understand about American pizza is that is sweet. Always so sweet. I bet they put corn syrup in their sauce. 

ImageItal

Wheat Pizza: Pizza of the farmer: pizza of the poors

two cups of flour (wheat organic)

one cup of room temp water

one small pack of rapid dry yeast

one spoon of olive oil

a pinch of salt

Put in the processor the flour with salt and yeast and mix. Then add the water and olive oil and keep mixing. When the dough is formed set aside, wrap in plastic paper and let it rise. This should take a couple of hours. I usually leave it all night.

Take the dough and knead after rising. Knead and knead. Add flour is needed. Shape the dough very very very thin and place on pizza tray, sprinkle with olive oil and a pesto sauce made with parsley basil, oregano, etc.

Oven should be preheated at 400. Insert the pizza without topics in the oven for approximately 10-15 minutes. With my oven is 15. Take it out and put the toppings on it. 

I put shredded mozzarella and some leftover organic cream cheese, caramelized onions and green fresh pepper. 

Put the pizza with toppings back in the oven now at 350 until the cheese melts. 

Enjoy!